
How to move from WordPress.com to a self-hosted WordPress system – WordPress.org?
Do you want to move from WordPress.com to a standalone WordPress system?
In an informal definition WordPress.com is a sort of diluted version of the WordPress system, suitable for people who have just started with their blog \ site.
who taste the first flavor of opening a blog / building websites and check whether they like the taste.
If you have decided to make the leap a standalone WordPress system (self-hosted) means that you have decided to take your site\blog more seriously, with personalization options for your design themes, adding custom plugins, improved maintenance, backups, and even raising the site's performance and security level.
In this article we will not list all the differences between WordPress.com and a self-hosted WordPress system, but we will explain the operations that need to be performed in order to make the move.
In brief, a self-hosted WordPress system (WordPress.org) is the self-hosted version as opposed to WordPress.com, where you have full customization of your site, whereas WordPress.com is hosted on WordPress's own hosting servers, which means you have to work according to their restrictions.
So let's check what is needed to quickly move from WordPress.com to a self-hosted WordPress system.
So... am I in the right position to start the migration?
What do you need to get started?
- Domain name that I own (for example: upress.co.il is the domain name of our site)
- Hosting package with a hosting company of your choice, preferably with a company that specializes in hosting WordPress sites.
- Account access details WordPress.com account, so that it will be possible to log in to the system and transfer all the data.
Step 1 – Log in to your WordPress.com site and export the data
To begin, you need to export all the data from your old site – WordPress.com – and save it on your computer, so that you can later import the data into the new site on WordPress.org. Log in to the site, choose Settings in the dashboard, and click Export.
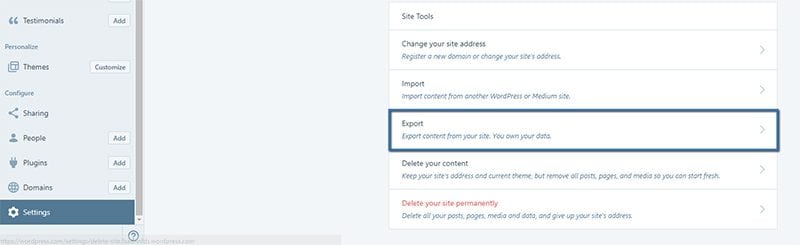 Original Hebrew uPress control panel. Follow the English instructions in this article; labels and positions may differ in the current interface.
On the next page we will need to choose "What do we want to export?" Remember that the current export process captures all the posts, pages, comments and images for transfer. The most inviting option is to click Export All, but if you want to transfer only part of the content – you can choose differently by clicking on The small arrow next to the Export All button.
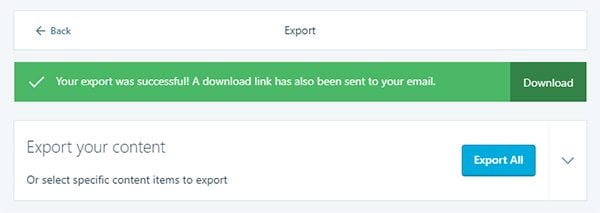
After a few seconds we will receive a message that the export finished successfully; click the button Download to download the backup file that was created.
Step 2: Creating a new WordPress site on self-hosting
Now that you have all the information you need from the old site, you can start creating your new site, in a standalone version.
In short, you first need to go through the process of installing the WordPress system on a hosting account that you purchase, and then continue with the process of moving to a standalone WordPress system.
If you do not yet have a hosting service suitable for WordPress sites – we would be happy to provide you with the most advanced hosting service available.Beyond hosting, the uPress system lets you perform, by yourself, easily and without prior knowledge, important actions for the smart operation of your site. The system was built in full compliance with the strict standards of the WordPress system. It is innovative, simple and easy to operate, written entirely in Hebrew, and offers a variety of plans to meet the needs of all of you.
After creating the hosting package, we will need to install a new WordPress installation (without any content), there are several ways to perform the installation, and we will not detail all of them in this article. If you are uPress customers The installation can be done as follows – WordPress installation guide.
Step 3: Import the data you exported back into the new site
Now that you have a new WordPress site on self-hosting, you can start importing the data into it (the data that was exported in section 1).
Log in to the dashboard of the new site, click the Tools tab and select "Import" to import the data from the old site.
 Original Hebrew WordPress interface. Follow the English instructions in this article; labels and positions may differ in newer versions.
Several import options will appear on the page – we will address only the WordPress option.
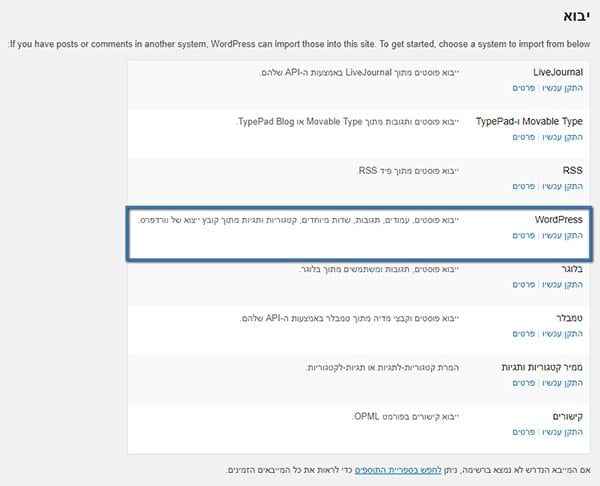 Original Hebrew WordPress interface. Follow the English instructions in this article; labels and positions may differ in newer versions.
This option is the recommended option for importing WordPress data, we will now need to install a plugin in order to import all the data. Click the button Install Now, and then click Activating the plugin.
The next screen lets us click the button Choose file, find the export file you saved on your computer (in section 1). After the file is uploaded in the designated place, you can click the button Upload and import to continue.
Note: It is important to note that the export file we received in section 1 is a ZIP file; we will need to extract it using a compression program such as winzip, and upload the file found inside the folder – a WXR file with an (.xml) extension.
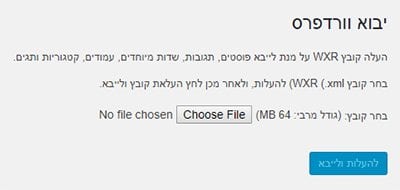 Original Hebrew WordPress interface. Follow the English instructions in this article; labels and positions may differ in newer versions.
After that, you need to decide whether to assign the imported content to a new user or to an existing user on your new site (WordPress.org). It doesn't really matter which option you choose, as long as the assignment is indeed to a user who will continue to edit the site's content in the future.
 Original Hebrew WordPress interface. Follow the English instructions in this article; labels and positions may differ in newer versions.
It is important to check the Download and import file attachments – to upload all the files, including images, from the previous site, click the button Submit and all the data will be transferred to your new site.
Step 4: Redirecting loyal visitors from the old site to the new site
Did the old site use a WordPress domain address? (for example: myname.wordpress.com)
In general, there is no reason not to send the loyal visitors of the old site to the new site (at the new domain address), unless the old site was full of spam comments or there were SEO problems \ some kind of Google penalty.
If your site is built properly and the SEO was built accordingly, there is no need to take any additional action at this stage, meaning – you can redirect all visitors who arrive at the old domain address to your new site, and search engines will be able to keep indexing your site and transfer all the reputation accumulated on the old site to the new one.
In addition, you can also send an email message (mailing) to your loyal visitors to update them about the site's new domain address, if it is new. If you don't yet know what a domain address is, you can read about it in the following article.
However, if you really want to do this so that visitors arriving at the old site are not redirected to the new site, you will need to go to your old WordPress.com site, enter the dashboard and click Settings – under the section Privacy choose the option Private – Your site is only visible to you and users you approve.
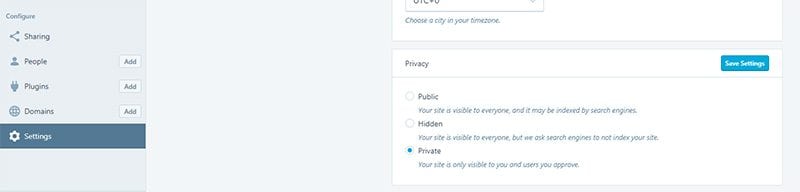 Original Hebrew uPress control panel. Follow the English instructions in this article; labels and positions may differ in the current interface.
This option is not recommended unless you truly think that the old visitors and the SEO will not be good for your new site.
Frequently asked questions
What if I don't want to do it myself?
Is there a way for someone else to move your site from WordPress.com to a self-hosted WordPress system? You can hire the services of a developer on an hours-bank basis to carry out the operation easily; the average time to complete the operation fully is up to about 4 hours (for the basic operation of moving the site).
Is a certain technical level required to carry out the transfer process?
Indeed, to complete the migration fully you need a reasonable level of technical skill – not the level of a web developer, but if you have any concern, it is worth getting help from a technical person who will accompany you through the process.
In any case, it is important to remember that the old site on the WordPress.com system is not supposed to be harmed in any case, and you can always change your mind and go back without any change on your part, so it is worth taking the opportunity and trying.
Does it matter where I bought my domain in the past?
No, it does not matter. If the domain was purchased in your name, you can easily point it to your new site. For example, if you registered the domain through WordPress.com, you can quickly transfer it by changing the A record to your new site. The same applies if you bought the domain directly from a domain registrar, such as the list you can see at the following link, for example – list of accredited registrars.
For uPress customers: we can help carry out the process and point the domain you own to your new site on uPress hosting servers.
Will all my comments, pages or data be lost during the transfer?
As long as you perform a full export of all the data from the previous WordPress.com site – everything should still exist on the new site as well.
Will I lose the search engine ranking I built in the past?
If you carry out all the actions correctly (including installing an SEO plugin, redirecting all 404 pages, etc.), you will not lose your ranking in search engines.
Replacing your site URLs and redirecting (301 redirect) to your new site helps preserve the reputation you built in advance.
Will my site experience downtime during the migration?
If you understand all the steps above, you will not experience downtime. Why? Because we keep the old site active throughout the entire process.
What happens to my images when I make the move?
All images are imported into the new site as long as you check the field Download and import file attachments in step 3.
Do I need to pay for this process?
No. This process is completely free (if you carry it out on your own), so it is worth a try.
The only thing you will have to pay for is Hosting plan to the site, which until now was hosted on WordPress.com's servers, and domain if one has not yet been purchased.
In summary
Informally defined, WordPress.com is a kind of diluted version of the open-source WordPress system, suited to people who have only just started with their blog / site.
If you have reached the stage where you want to take your site one step further, this is indeed the guide for you.
I hope I managed to convey, as clearly as possible, how to move a WordPress.com site to a self-hosted WordPress system (WordPress.org).
If you think I missed something – I would love to hear about it in the comments at the bottom of the article.