
If you happen to visit many websites during your day, you surely know the importance of the "site loading speed" of the sites we visit. Like Google, of course.
A small delay in loading can be a decisive factor in the user experience, and a factor that relatively affects the site's score in the various speed-testing tools. you can read at length in a separate article written on the subject.
Statistically, people don't like to wait, and they lose patience after a few seconds of waiting. So if you want to create a successful site, you must take this very seriously and improve your site's speed.
Improving site speed is without a doubt a complex and not simple topic; there are several accepted ways to improve site speed, the most common of which is installing a caching plugin.
There are quite a few caching plugins in the plugin directory of WordPress.org.
Today we will focus on the plugin that, in our opinion, does the best job relative to the amount of time invested in configuring it. The plugin is WP Rocket.
 WP Rocket: configuring the caching plugin for better performance. Original Hebrew article artwork.
In the following article we will see how to install and configure the plugin WP Rocket In order to get to For maximum results.
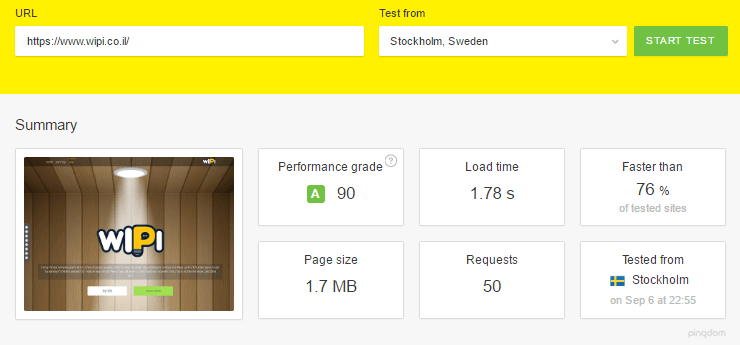
Before we start improving your site's speed, we recommend running a speed test using speed testing tools such as Pingdom.
Here, for example, is a screenshot of our test site (before installing WP Rocket).
Getting to know the plugin
WP Rocket is a premium WordPress caching plugin. The plugin was created by Jonathan Buttigieg, Julio Potier, and Jean-Baptiste Marchand-Arvier.
The plugin was released to the market about three years ago, but made its official debut a little over two years ago (July 29, 2014).
The plugin's price starts at $40 for a single site and goes up to $200 for the unlimited package, the price is per year for updates and support.
The plugin offers options for page caching, cache preloading, minification, file combining, Gzip compression, DNS prefetching, CDN support, and support for multisite sites.
In addition, the plugin supports loading images with Lazy Load, which ensures images are downloaded only when they are displayed in the browser (on your screen).
Installing and configuring WP Rocket
WP Rocket is a very useful and powerful plugin, but unlike other caching plugins it is not equipped with a pile of options.
In fact, this plugin is the exact opposite of the W3 Total Cache plugin. There are only a few options you will need to configure in order for the plugin to work on your site.
If you are a beginner and you are installing the WP Rocket plugin for the first time, please follow the instructions below.
before starting the installation, you must make sure you have removed all other caching plugins, such as W3 Total Cache or WP Super Cache.
This step should be performed before starting the installation of the WP Rocket plugin, to make sure you don't run into any problems during the plugin's activation and setup process.
Downloading and installing the plugin
Because the WP Rocket plugin is a premium plugin, the first thing you need to do is download a version of the plugin from their website.
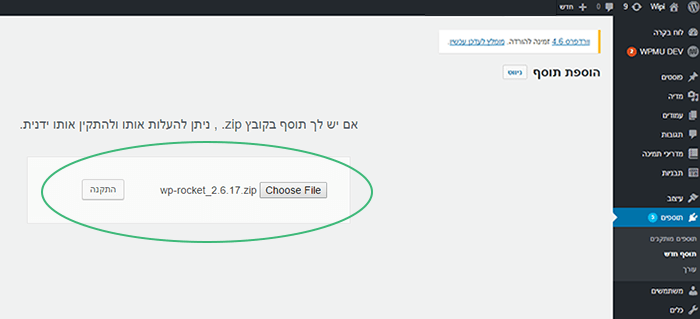
Once you have downloaded a version of the plugin (a Zip file), you can install it directly from the WordPress dashboard > Plugins > Add New > Upload Plugin (button).
 Original Hebrew WordPress interface. Follow the English instructions in this article; labels and positions may differ in newer versions.
Go ahead, upload the plugin and click the Install button.
Activate the plugin
After activating the plugin, a new option named WP Rocket will be added to the top bar menu (and also under Settings > WP Rocket).
Unlike the other premium plugins, this plugin does not require activation or approval with any license key, so your user experience is likely to be very good.
Basic options
 Original Hebrew WordPress interface. Follow the English instructions in this article; labels and positions may differ in newer versions.
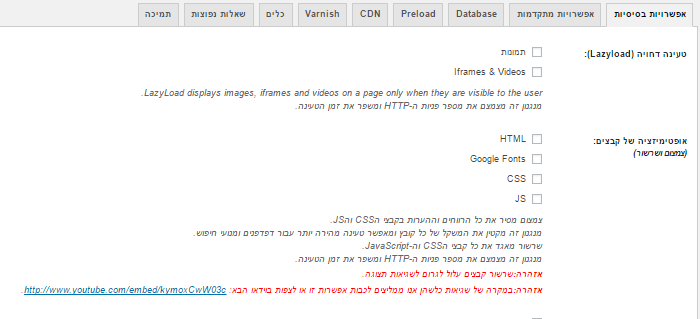
Now we go to the basic settings screen by clicking Settings > WP Rocket in the WordPress admin panel.
On this screen we can find basic settings such as deferred image loading (LazyLoad), file optimization, disabling Emojis, cache lifespan and more.
Deferred loading (Lazyload)
 Original Hebrew WordPress interface. Follow the English instructions in this article; labels and positions may differ in newer versions.
LazyLoad is an easy and efficient method that ensures that the images and video on your page are loaded only when the visitor reaches the part where the image is supposed to be displayed in the browser.
This method is an easy and quick way to cut page load time, and using it saves resources on both the server and client side.
Note: it is recommended to enable the Lazyload option if you have a large number of images displayed on the site.
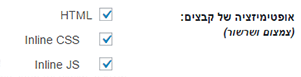
Internal code optimization (Minification – Html, Inline CSS, Inline Javascript)
 Original Hebrew WordPress interface. Follow the English instructions in this article; labels and positions may differ in newer versions.
Optimizing the lines of code written inline in your WordPress site's pages (HTML, inline CSS, inline JavaScript) can bring a certain (not very large) improvement in your site's loading speed,
This action will reduce the data processing time of every single page on your site by removing spaces and lines, and removing code comments.
Today most WordPress sites use external Javascript and CSS files, which are loaded into the page by a call. Therefore this action should not significantly improve your site's loading speed.
Warning: from time to time, this action may break the theme's code.
Google Fonts optimization

Optimizing Google Fonts will reduce the The number of HTTP requests of your WordPress site.
This is done by saving the requests (CSS files) in the cache, reducing spaces and lines, combining all the requests, and removing code comments.
Warning: Occasionally, this action may cause the fonts on the site to stop working.
Optimizing external files (Minification)

Optimizing Javascript and CSS files can cause a significant improvement in your site's loading speed,
This will reduce the weight of your static files by minifying whitespace and lines and removing code comments.
Warning: from time to time, this action may break the theme's code.
In such a case you will need to make an adjustment in the theme, or prevent optimization of certain files under advanced settings.
Cache for Mobile users

You can use this option without changing anything in your design theme, whether it is responsive or not, and without adding any kind of Mobile plugins.
This action will ensure that your site loads on Mobile screens as fast as it loads on Desktop screens.
It is advisable to use this option if your site receives a lot of traffic from Mobile screens, you can check this by viewing your Analytics account.
Enabling cache for logged-in users

You can use this option to allow the cache to be shown to logged-in users (a site admin or a content editor, for example).
If this option is not checked, visitors who are not logged-in users will receive the site from the files stored in the cache,
Also, logged-in users will receive the site with no cache at all (useful for development mode or when changes are being made to the site).
Cache for SSL pages

By default, is not performed Page caching is not performed for pages with a secure https link,
You can use this option to enable caching for these pages – with an SSL certificate.
Disabling Emoji's

By default, WordPress loads JavaScript and CSS files that convert text emoji, for example: 😉 – into a scaled-down image of the icon.
This option is more common among forums and blogs with many comments, if you have no use for this option – turn off WordPress's Emoji loading.
Using this action will reduce the number of HTTP requests of your WordPress site, will save the Emoji script's operation in the background, and will make your WordPress site faster.
Cache lifetime
 Original Hebrew WordPress interface. Follow the English instructions in this article; labels and positions may differ in newer versions.
Finally, define the cache lifetime of your WordPress site, after which the cache is automatically deleted and regenerated when this period expires.
If you set a cache lifetime too short – your site's cache will be deleted and renewed over too short an interval, and users may visit your site while the cache is being renewed (not recommended).
If you set a cache lifetime too long – your site's cache will be deleted and renewed at too long an interval, and users may will miss the latest and most up-to-date content that was published.
Leave your cache lifespan set to about 24 hours (the default value).
Advanced options
In addition to the settings mentioned so far, the WP Rocket plugin allows you to use advanced options, such as:
- DNS prefetching
- Defining pages for automatic cache clearing when a post is updated
- Defining pages that should never be cached
- Defining pages that should never be cached, based on cookie usage
- Defining pages to be cached according to the use of a string
- Define pages that should never be cached according to user agents
- Combining several external files into a single file
- CSS files that should never be cached
- Javascript files that should never be cached
- JavaScript files to be included at the bottom of the page during file minification and merging
- JavaScript files with deferred loading
In most cases, the average user does not need to change anything in these settings, so we will not elaborate on them in this article. Another article on this topic alone will be published in the future.
So what are The recommended settings for my WordPress site?
The million-dollar question, what are the magic settings that suit all of your WordPress sites?
The truth that there are no magic settings that fit all sites, every site has a different page structure (more images/fewer images, more mobile-friendly/less mobile-friendly, more video/less video, etc.),
Every site has a different theme, a different code level, a different type of audience, a different security level, and different uses..
Therefore, we will need to adjust the WP Rocket plugin settings according to our site; this process should take between 3-5 minutes for every site. For demonstration:
- A site that appeals to a large number of users on mobile devices – we will make sure to enable the Mobile cache option; otherwise we will not enable it.
- A site that displays a long page with a large number of images – we will make sure to enable the Lazyload option for the images.
- A site that displays a long page with several videos – we will make sure to enable the Lazyload option for the videos.
- A site that uses an SSL certificate and loads secure links – we will make sure to enable the SSL cache option.
- On a site that uses an up-to-date theme made by a well-known, reliable company, we will allow optimization of external files without concern.
To reach optimal settings for your site, you will need to adapt the WP Rocket plugin settings to the nature of your site,
Of course, you can run several test attempts and measure the resulting outcome using several tools for testing your site's speed, such as Pingdom or GTmetrix.
It is important to note: After saving the settings, the WP Rocket plugin will read all the files, minify whitespace, reduce lines, remove code comments, combine files, and finally – will create new, minified files and save them in the Cache folder of your WordPress site.
This process takes a little longer than a regular load of your WordPress site, so wait patiently, the phenomenon is completely normal.
In addition, it is recommended that after every change or saving of settings in the WP Rocket plugin – visit the site as a regular user (not in the dashboard area), and only then run a speed test.
While the metrics obtained from these testing tools can be very useful, it is important to keep things in proper perspective.
It is true that the data and information received from these tools can indeed help improve your site's score, but we must not forget the user experience.
The score obtained from these tools will not always reflect the fast user experience.
For demonstration:
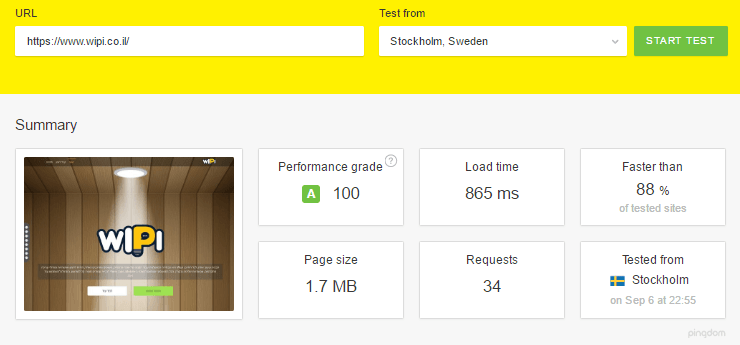
on the site www.wipi.co.il measured in this article (an image is attached at the top of the article), We used the following settings:
Basic options:
- Internal code optimization (Minification – Html, Inline CSS, Inline Javascript)
- Optimizing external files (Minification – Javascript, CSS)
- Cache for Mobile users
- Cache for logged-in users
- Cache for SSL pages
- Disabling Emoji's
- Cache validity period – 24 hours
Advanced options:
- DNS prefetching (for facebook.com)
- Combining several external files into a single file (for CSS files)
- JavaScript files to be included at the bottom of the page during file minification and merging
And this is the result obtained after retesting:
In summary
WP Rocket is advancing step by step toward the title – "The WordPress caching plugin with the best user experience".
Unlike other caching plugins, it isn't equipped with a pile of options. The plugin's price starts from40$
We hope this article helped you understand how to install and configure the WP Rocket plugin for maximum performance, and improve the speed of your WordPress site.
You can read on the same subject – How to Get a 100/100 Score in Google PageSpeed Insights.
